How to: Exit logic
Introduction
Sometimes you will want respondents to exit a survey before the end. This may be because they do not fulfil specific criteria, they need parental permission, or any other reason. Exit logic is applied to a question and activates once a respondent clicks the [Next] button in the relevant section – instead of progressing any further through the survey or consultation they will be taken immediately to the Exit message screen.
Adding exit logic
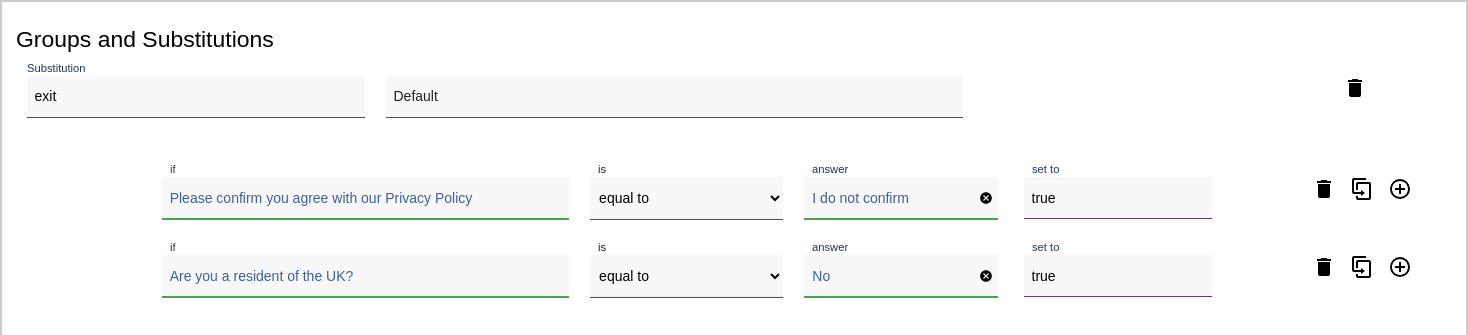
The 'exit' is triggered from a survey substitution variable called 'exit'.
- Navigate to the Substitutions tab of the Edit Survey page.
- Select [Add group or substitution] and name your substitution "exit". Leave the 'default' blank.
- Select [+logic] and add your logic as usual, choosing the conditions on which the exit will happen, and then set to "true". Logic combines in the usual way. Usually you will pick one question that triggers the exit, but you can set as many questions as you need.
Adding an exit message
If you are using exit logic on your survey, don't forget to add an Exit message for your respondents using the messages page of the survey editor. Sometimes you may want to use a redirect URL instead of a message, if you would like to redirect the respondent to another site on exit. The exit message and redirect URL have full support for survey substitutions, so panel IDs or question answers can be passed in.
Advanced - multiple exit messages
In some instances, it can be useful to have multiple exit messages built into your survey. Primarily this is used where the exit criteria will affect the desired messaging. For example, when one exit route is based on geographic location and another is based on non-agreement to a policy.
Steps to building multiple Exit messages:
- Firstly, navigate to the "Substitutions" tab in your survey editor and set up your exit logic as usual.
- Use [+ Add Another Group or Substitution] to create a substitution for each desired exit message. In this example we have named our substitutions "Message-1" and "Message-2" (please note that substitution names cannot include spaces, we have used a hyphen in our example). For more information, please refer to our "Substitutions Logic" document.
- For each substitution, add logic for the case where you want the message to be shown. In this example, I want the exit message to show when the respondent answers "I do not confirm" to my 1st exit question or "no" to my 2nd exit question. Type "true" into the "set to" field.
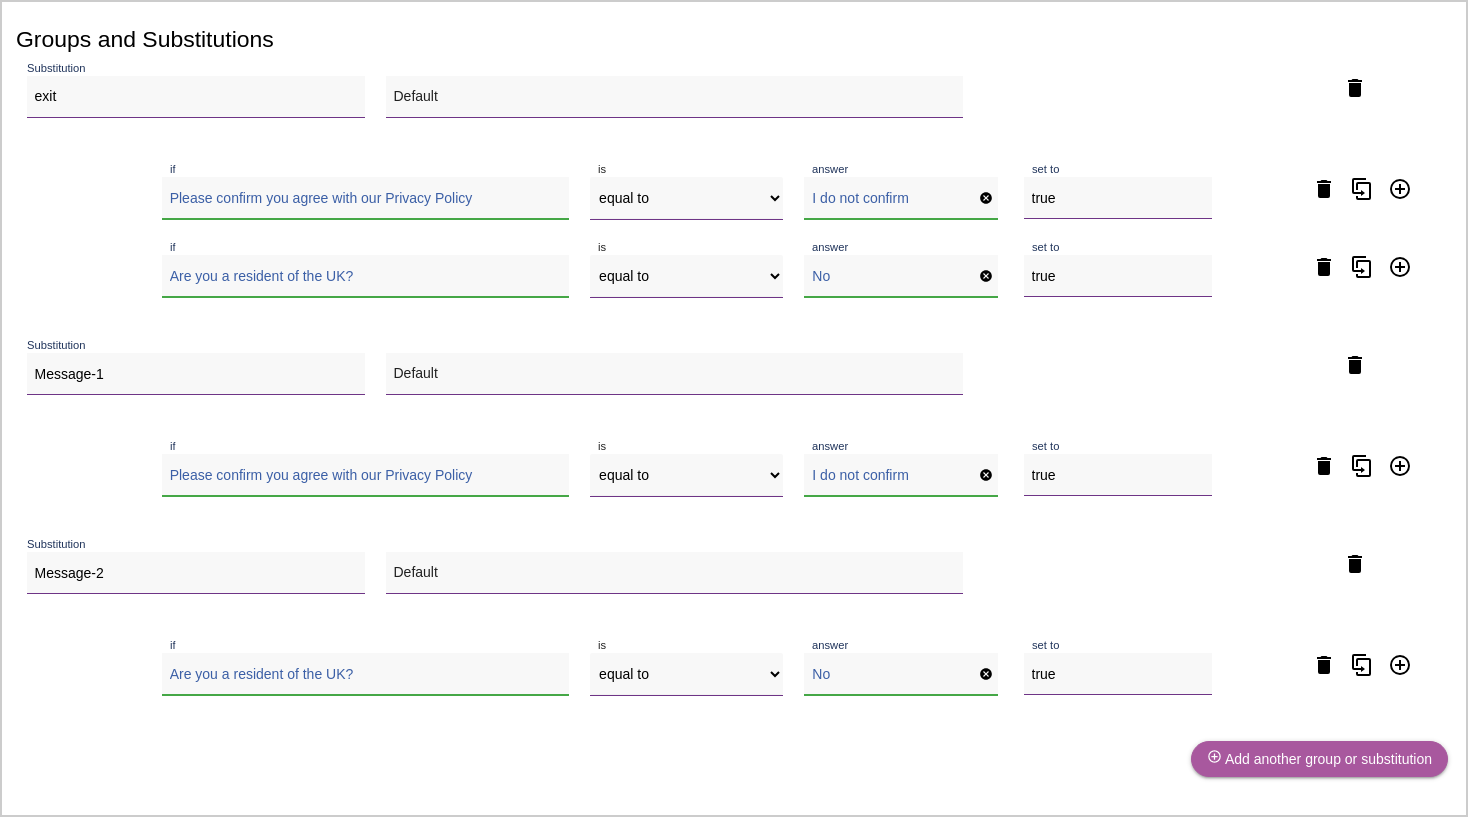
- Navigate to the Messages tab and input your desired messages into the Exit message.
- Wrap the message which is only relevant to the first exit route in conditional substitutions (using the substitutions created in steps 2 and 3), for our example this means using
"{{#Message-1}}"at the start and "{{/Message-1}}"at the end. This will reveal the wrapped text in the case where the respondent of a closed survey exits the survey from the first exit route. - Repeat step 5 for the second exit message, using for our example the
"{{#Message-2}}"at the start and"{{/Message-2}}"substitutions. This will reveal the wrapped text in the case where the respondent of a closed survey exits the survey from the second exit route. Our example exit message editor looks like this:{{#Message-1}}Unfortunately we can only accept submissions from respondents who are willing to agree to our Privacy Policy. {{/Message-1}}{{#Message-2}}Unfortunately we can only accept responses from the UK for this project. Thank you for your time.{{/Message-2}} - Provided you have completed all the above steps correctly, your multiple exit messages will now be set up, with the exit page displaying different messages depending on how the respondent exited the survey.