How to: Create a Survey, add Questions and Publish
Introduction
This 'How To' will explain the process of building a new survey, from creation through to publishing. It will take you through the steps from inputting a title and introductory text, to adding questions and a heading, to publishing the survey so that you can begin collecting responses.
Steps to Create a Survey
Building a survey
To build a new survey from scratch, head to the Surveys page. Select the [+Create survey] button. A menu will appear offering the choice to create a survey either from a template, or to create a new survey – for this example please choose create a new survey option. You will then be taken to the "Survey editor".
Adding survey details
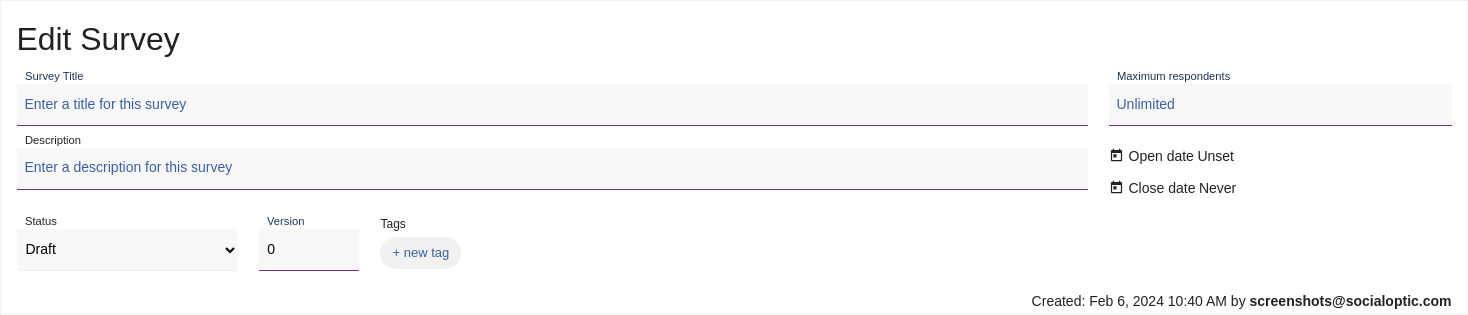
- First choose a title for your survey and enter it into the Survey Title field. The title will be shown to respondents.
- Next you may wish to enter a Description. This is only visible to you and and is an optional field. We find it is useful for explaining what the survey is and documenting any information which may be relevant in the future, for example, which year or project it relates to. Similarly, the Purpose and Intended audience fields are also included for additional internal use. A Pretty Url can also be set here, replacing the default string.
- You can choose a maximum number of respondents, or leave this field blank. We recommend you add a maximum if you have a particular survey population you hope to reach, for example a team of 20 people. We recommend you leave it blank if you would like to collect as many responses as possible.
- Adjust the open and close dates of the survey using the date pickers. If left unset, by default the close date will be set a month after the publish date.
- Similarly, you may choose to set your open date now or leave it blank. If you set your open date to a date in the future, once published the survey will automatically open on this date. Otherwise, the open date will be set when you publish the survey. These dates can be set and managed both here at the top of the Survey editor and from the Surveys page, using the toggle and date picker to update.
- You'll notice that the "status" of the Survey is currently set to "Draft". These can be left as they are. Once the survey is published, the status will be changed automatically.
- Click the [Create Survey] button at the bottom right of your screen to begin building your survey. This action is essentially your first save so we recommend you click to create your survey as soon as you’ve entered the basic survey information.
Adding Questions
This section will guide you through adding 3 common question types including short text, multi-choice and Likert scale questions, using examples.
To get started with adding your questions, simply click [+Add Question] and you will see a field where you can enter your first question. Type in your question text. For our example we will ask for the respondent’s organisation and click [+Add]. The question is added and the tile will expand. It is created as a ‘short text’ question type by default. This question type gives respondents a small text box to input their answer.


Next we will add a multiple-choice question. To start, click the [+Add Question] button and fill in the question text as shown in the screenshot. Once entered, select [+ Add]. Then in the expanded question editor, click on the question type button which currently reads [Short Text], this will open the "Question Type" menu. Select the [Multi-Choice] option.

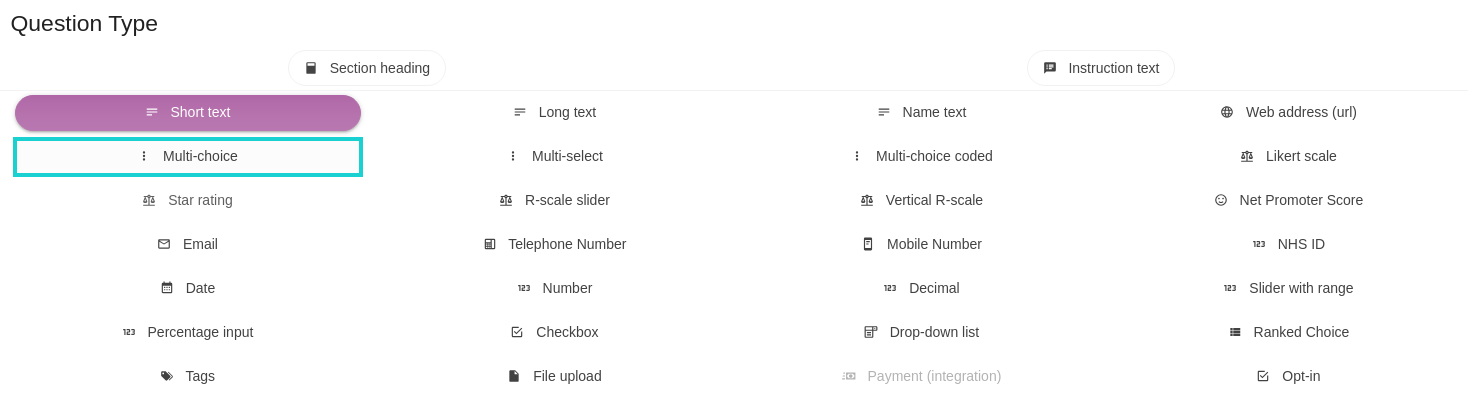
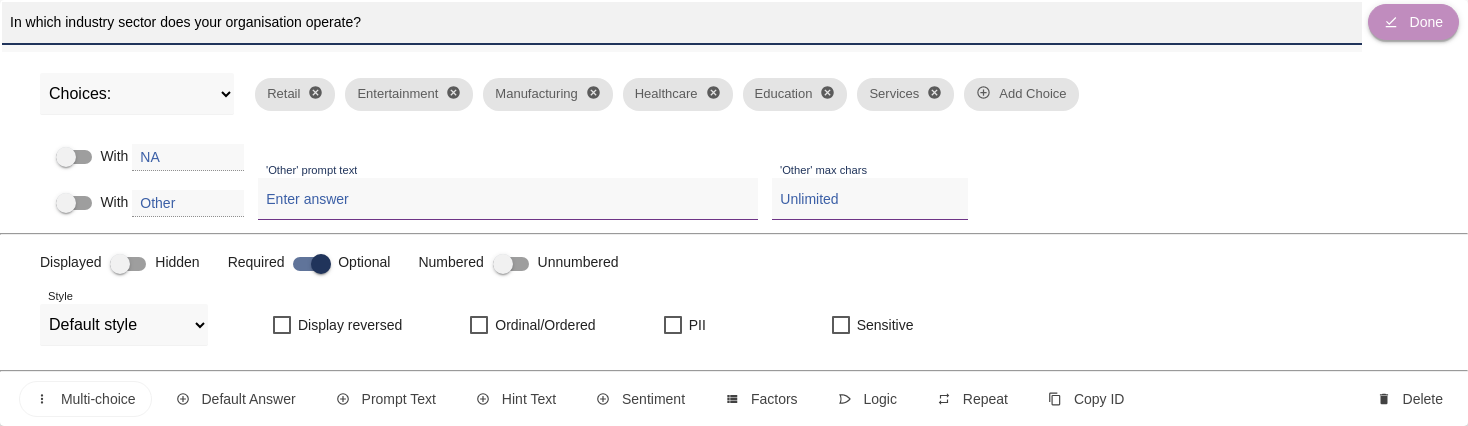
The menu will close and you will notice that a new line has appeared in your question tile with a dropdown reading Choices and a grey button labelled [+ Add Choice]. Click in the empty button which says [+ Add Choice] and begin adding your answer choices. Hit the "Enter" button to confirm and begin adding another choice. You may also paste a list of choices in from elsewhere, provided they have been separated by a comma or new line. For our example, we have asked which sector the organisation operates in and listed appropriate options. You can click and drag to reorder the questions by hovering over the left hand side of each choice’s button, and dragging it before or after other choice buttons. You can also delete an option by clicking its [X]. Once you have added all the choices you desire, you may click [Done] to collapse the question tile into a smaller format.

For our next question, we will add a Likert. Add a new question in the same way as before and change the question type to a [Likert Scale]. You will notice that this question type adds a new drop-down menu listing different Likert scales. For our example, we have chosen an "Agreement 5 point" scale which has added the familiar "Strongly disagree" – "Strongly agree" scale as answer choices. We have asked for a response based on the statement "My organisation has been negatively affected by the recent economic changes".
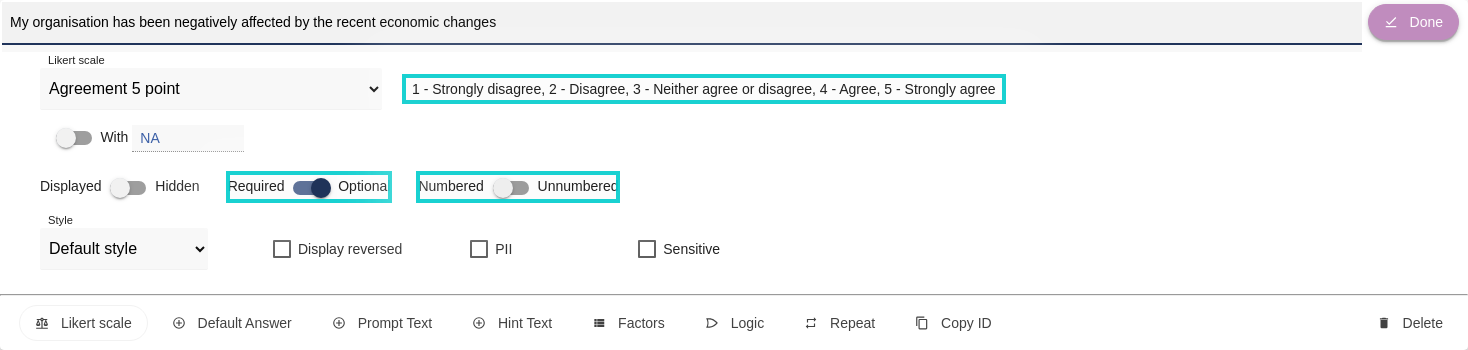
The example questions so far have all been optional, which means that respondents can skip these questions if they choose. You may wish however to make some of your questions required. This can be changed using the Required/Optional toggle on the question tile. Our example questions have also been numbered so far. Again, this can be changed using the Numbered/Unnumbered toggle on the question tile.
Now that we have added our three questions, select [Save]. If you haven’t yet created your survey then you will see a [Create Survey] button, instead of the [Save] button. Do remember, it’s important to create your survey as soon as possible to prevent losing any progress.
In order to preview your survey, you should click on the [Test] button. This will give you two view options – Section, and All sections. You can read more about these in the Testing your survey guide. Essentially, you can view all questions on one page in order to review questions and their formatting quickly. Or, you can step through the survey one section at a time just as a respondent would.

Our example looks like the below. The exact appearance of your survey will depend on the settings in your instance of SurveyOptic and any custom themes you may have: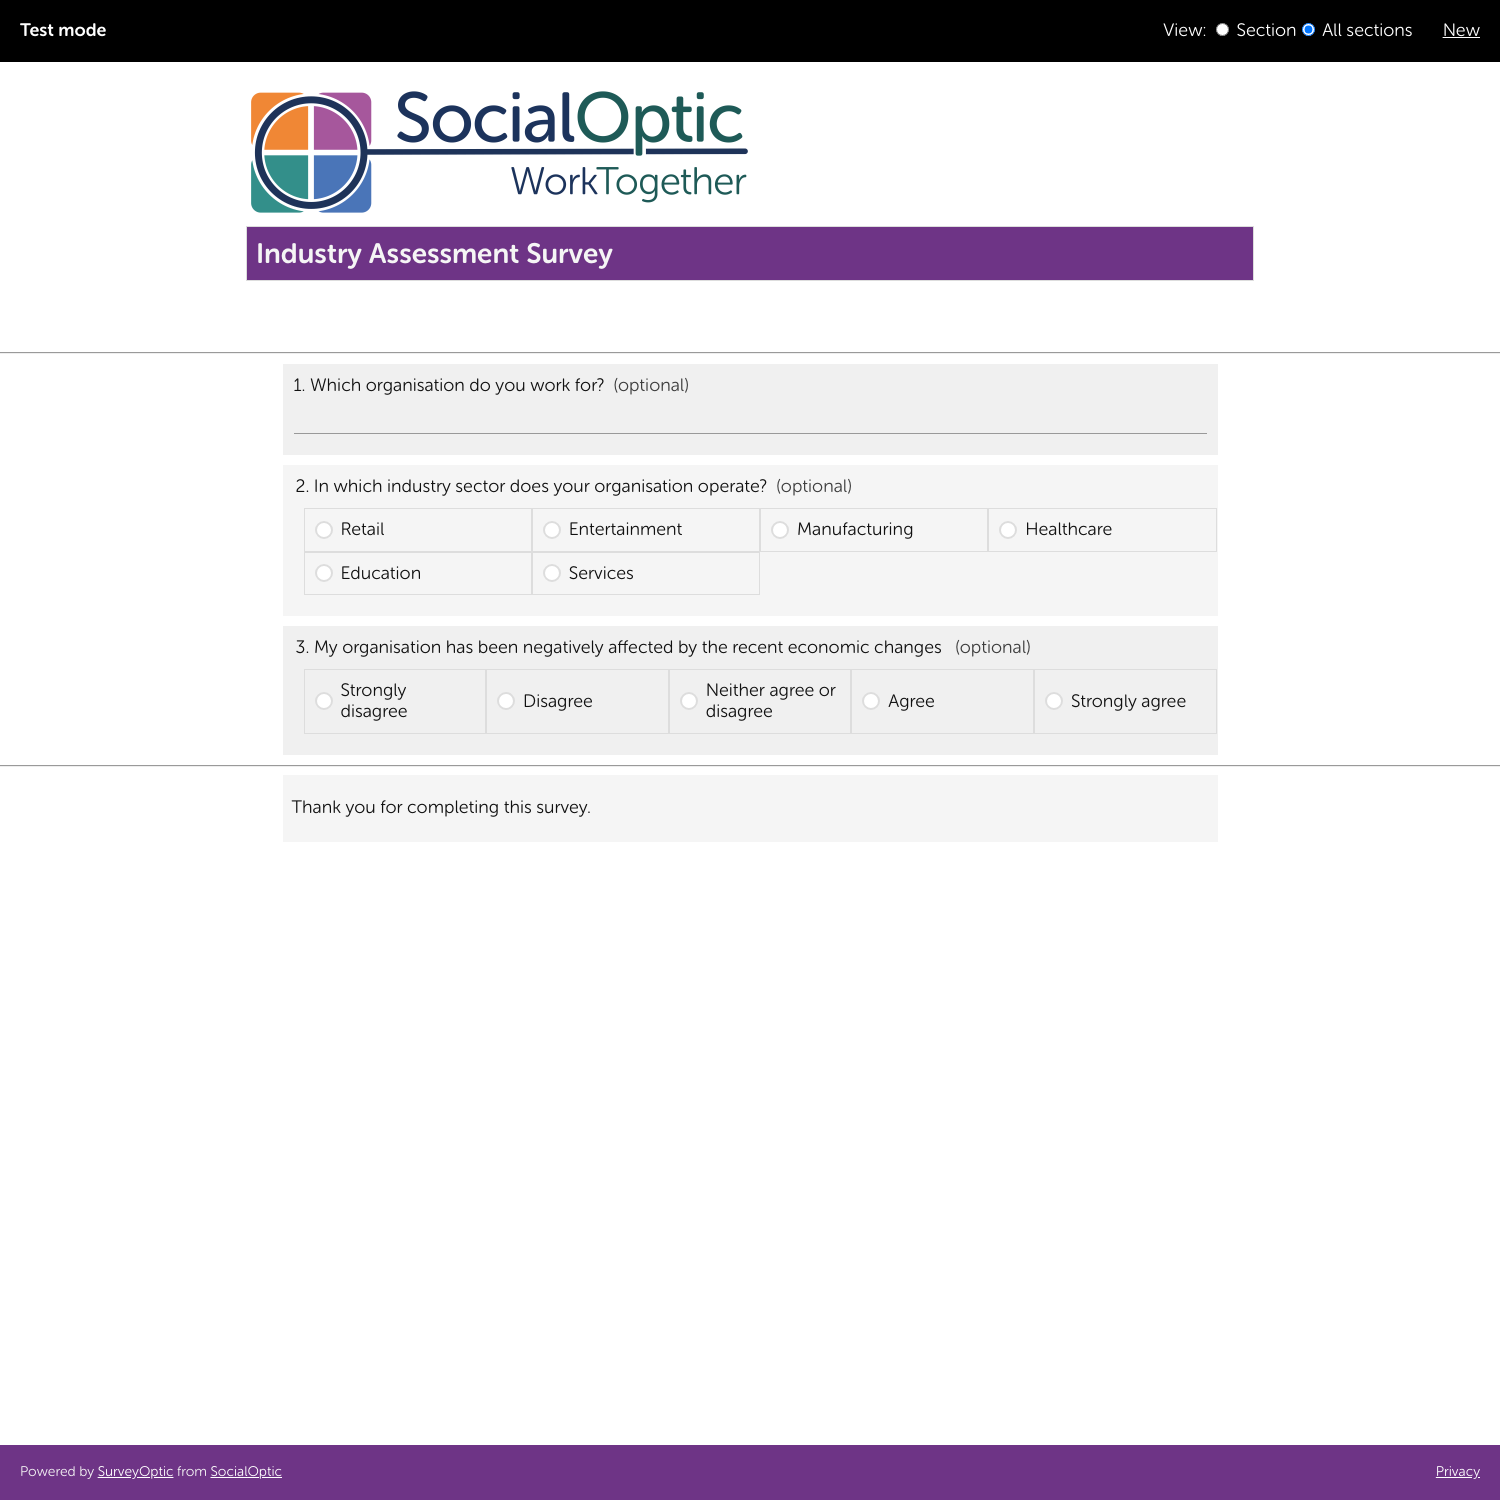
After viewing your survey, return to the Edit Survey page to make additional changes.
Additional Editing
- You can continue to add questions to your survey by selecting the [+] button between questions, or by selecting the [+ Add question] button at the end of your question list.
- Questions and any relevant choices can easily be edited by clicking on the [Edit] button or the question text itself.
- You can also delete a question by opening a question to edit it, then using the [Delete] button. This is reversible until you save your survey. You can reverse deleting a question by opening it to edit and using the [Undelete] button.
- Each question also has a [Repeat] button to create a duplicate. This can be useful when creating a series of likerts for example with minor changes to each one.
- Questions and text items (section headings, instruction text) can be reordered by clicking and holding the drag icon on the Question Summary tile, and moving the item to its intended position. This is useful both for when you want to change the order of questions in a survey to help it to flow better, or also when you are building a survey and wish to 'repeat' a question and move it elsewhere.
- For every question type, you will be able to edit whether the question is displayed/hidden, required/optional or numbered/unnumbered with toggles.
- You can change the way the question or answer choices are visually presented to respondents using the Style dropdown.
- Using the checkboxes within the question editor, you can flag personally identifiable information (PII) and sensitive data so that it can be handled appropriately during reporting.
- SurveyOptic currently has over 30 different questions types with many permutations of each question - for example over 70 different Likert scales, layout choices for multichoice or option questions, different length or numbers of inputs for text questions.
- More advanced question options are also available, read the Survey Editor explainer document for more information.
Sections
You can divide your survey into sections using the Section heading question type and even add some additional text with the Instruction text option. This breaks up your survey making it easier to follow.
If you would like to create a page break in your survey without adding a new heading, you should insert a Section heading question type, but insert an “x”, as a single letter with no quotation marks, instead of a heading. This can be helpful where you have a long section with lots of questions, and wish to spread them across multiple pages.
If your questions are numbered, you can choose to allow the numbering to flow throughout the survey, or restart it at the beginning of your sections – or a mixture of the two if you prefer! A simple page break with no heading can be achieved by using an 'x' as your header text.
Messaging
Each survey has the option for a custom Welcome message and Thank you message. You can edit the content for these pages in the Messages tab on the Edit Survey page. Use the WYSIWYG (‘what you see is what you get’ meaning you can see your text formatted as it will be presented to respondents; pronounced as “wiz-zee-wig”) editor and SurveyOptic will create a webpage with that content. The welcome page will be presented before the questions are presented, and the thank you page will be presented after the questions are submitted. We would recommend including custom welcome and thank you messages in your surveys to provide additional context, information and an enhanced respondent experience. For example, it can be useful to mention supporting documentation (and perhaps link to relevant pages) in the welcome message, as well as including instruction on using the interface such as respondent answers being 'saved as they progress through the survey'. For further information on creating these messages, please refer to the How To – Thank You Page document.
Publishing and Sharing
With your survey built, we would recommend testing the survey to ensure it functions as you expect. This is also a good opportunity to invite colleagues to offer any suggestions they may have after going through the survey themselves. For further information on testing your survey, please refer to the How To – Testing your survey document.
Once you have finished creating your survey, you can click [Save and Publish], to start collecting responses. Alternatively, you can use the [Publish] button on the survey tile in the Surveys page.
You can access and share the link to your survey by using the [Share] button in the survey editor or on the surveys page. A menu will open with options to copy the survey URL or a QR code to share.
With the survey built, published, and shared, you have completed all of the steps involved in deploying your survey. If you have further questions, you can always contact the SocialOptic team and we'll be happy to help.